
Thinking of Doing The Optional Labs? Start Here
Last updated: 19 February 2026 (change in debug system requirements)
When you attend an OSR seminar that includes lab exercises involving driver development, if you want to try the optional lab exercises you’ll need access to a driver development and testing environment.
Setup requirements for this environment will vary depending on the particular class you’ll be attending. So please make sure to check with the OSR Seminar Team to determine the setup requirements that apply to your specific seminar.
Which Seminar?
This page describes the general lab system setup requirements, and are primarily designed for our WDF Core Concepts seminar. If you’ll be attending a different seminar, the requirements might be different. Check with the OSR Seminar Team to know what you’ll need.
What Systems You Will Need
You always need two systems running Windows to develop drivers: You need a Development System with Visual Studio, the SDK, and the Windows Driver Kit (WDK) installed. You will also need a Test System, which is the system on which you’ll be running and testing the driver code that you build on your Development System.
The Test System can be a physical machine running Windows that gets its address using DHCP and is on the same LAN segment as your Development System. Or, in most cases, the Test System can be a Virtual Machine (VM) that you run as a “guest” on your development system.
If the driver you’re developing does not access hardware (for example, if it is a software-only driver) your Test System can be either be a physical machine or (b) a VM that runs on your Development System. Most of the time, people choose to use a VM (just because it doesn’t require extra hardware).
In this case (your driver doesn’t manipulate hardware) you can choose whatever VM system you prefer. At OSR, we historically used VMware but have recently switched completely to using Hyper-V (for a lot of reasons, not the least of which is that it’s super fast to boot and reboot).
If your driver manipulates hardware your Test System will either need to be: (a) a physical machine (connected to the same LAN as your Development System and using DHCP, as noted above), OR (b) a Virtual Machine running on your Development System to which you can pass-through your hardware device.
The lab exercises for the WDF seminar are all “PnP software only drivers” that can be run in any VM, except for the USB labs that use the OSR USB FX2 board.
If you want to do any of the labs using the OSR USB FX2 board (this is entirely up to you), your debug machine must be either a physical machine or a VM that allows you to pass the USB device through to your target machine. Note that Hyper-V does not allow device pass through. Other VM systems (such as VMware, VirtualBox, QEMU) do support USB device passthrough with varying levels of reliability.
How to Setup Your Test System
This one is easy: All you’ll need is a system running a reasonably recent version of Windows (we recommend Windows 11, but it’s up to you) with nothing else installed on it. You’ll need admin access to this system.
You will also need to enable kernel debugging on your Test System using the BCDEDIT utility. How to do this is pretty clearly described in the Lab Assignments handout. We’ll also discuss this in class.
How to Setup Your Development System
Your Development System will need to be running a version of WIndows that’s capable of supporting Visual Studio 2022. You’ll also need the following software installed and tested.
When you’re doing the lab exercises from your home or from your office, you should be able to use whatever system you normally use for development, assuming you can successfully install the software we list.
About WDK Versions and Targeting Older Versions of Windows
The latest Windows WDK works with Visual Studio 2022 (only). It only supports building drivers for Windows and later systems using 64-bit x64 or ARM64 processors. It does not support building drivers earlier versions of Windows, or for 32-bit hardware. You can read more about this, including our take on the situation, in our Developer’s Blog post on this topic. Because it is the “latest and greatest, this is the version we recommend you use if you choose to do the labs for your seminar.
Earlier versions of the WDK, which work with Visual Studio 2019, are supported for building drivers that target Windows 7, Windows 8, and WIndows 8.1. If you need to write drivers that support versions of Windows prior to Windows 10, you’ll need to stick with VS2019 and Windows WDK 19041.5738.
Your Development System will need to have the following software installed:
- Microsoft Visual Studio (VS) 2022 with the latest updates, the Windows WDK (this is labeled WDK 26100.6584 ), and the matching Windows SDK (version 10.0.26100 matches WDK 26100.6584).
If you’re installing Visual Studio specifically for this class, we recommend you install Visual Studio Professional. If you already have VS 2022 installed on your system and working with the latest Window WDK you can use that. You don’t need to reinstall VS just for the class.
The links and complete installation instructions for downloading and installing VS, the WDK, and the SDK can be found at https://docs.microsoft.com/en-us/windows-hardware/drivers/download-the-wdk (opens in new tab).
Microsoft’s instruction page (linked above) can be slightly confusing. Ignore the section on WDK NuGet package support. For the purposes of this class, don’t install the WDK with NuGet. Don’t even read this section. Also, ignore the section on the Enterprise WDK. While the Enterprise WDK can be a great tool, for the purpose of this class, it isn’t useful.
Be sure to read and following the Microsoft instructions above carefully. The order that you install the components matters. Install Visual Studio first. Pay particular attention to installing the specific packages that are mentioned for Visual Studio. Install the SDK next. Then install the WDK. You have to do the installs in this order, or things won’t work. - For minimum annoyance, you will want to test your installation of Visual Studio and the WDK before trying to do any of the labs associated with the seminar. Detailed instructions for testing are provided below.
That’s it! If you have ANY questions regarding the required configuration, please contact our seminar team: seminars at osr.com.
How to Test Your Development System
If you’re already familiar with Windows driver development using Visual Studio you know what to do to test your installation to make sure everything is properly configured and working. If you’re new to Windows driver development, here are some steps that you can take to test your installation to be sure you’re ready to go for your seminar’s first lab session:
- Basic Validation: Start Visual Studio. From the VS “File” menu select “New” and then “Project”. A “New Project” dialog should appear and under “Installed” and “Visual C++” should be an entry named “Windows Drivers” with several types of sub projects under it. If this is what you see, “Cancel” out of the dialog and proceed to Step 2. Otherwise check and re-check your VS and WDK installation before you do anything else. If you continue to have problems, contact the seminar team by email.
- Check the Debugger: Ensure that the Windows Debugger (WinDbg) is installed on your development system and that you can start it. You might want to put a short-cut in your tool tray to the file in this directory. Note that depending on how you installed the SDK, you may also have an entry for WinDbg in your Start screen. This will point to the version installed by the SDK.
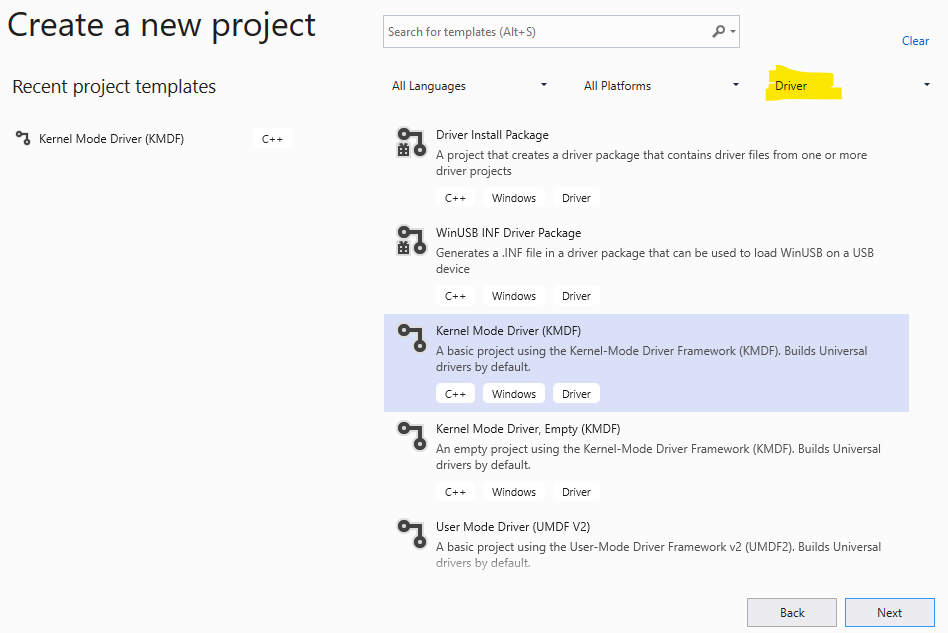
- Build a Test Driver: The final test for Visual Studio is to build a sample driver using the WDK. For this test, you’ll build one of the starter “template” WDF driver projects. If you won’t be attending a WDF seminar, don’t worry. The goal here is just to test that Visual Studio and the WDK are installed and working. If you can build one type of driver, you’ll be able to build any type of driver we’ll be creating in class. For this test once again start Visual Studio. Select “Create New Project” from the startup dialog and change “All Project Types” to “Driver”. You should now see several driver project templates. Select the one that reads “Kernel Mode Driver (KMDF)” in the center pane, like you see below:
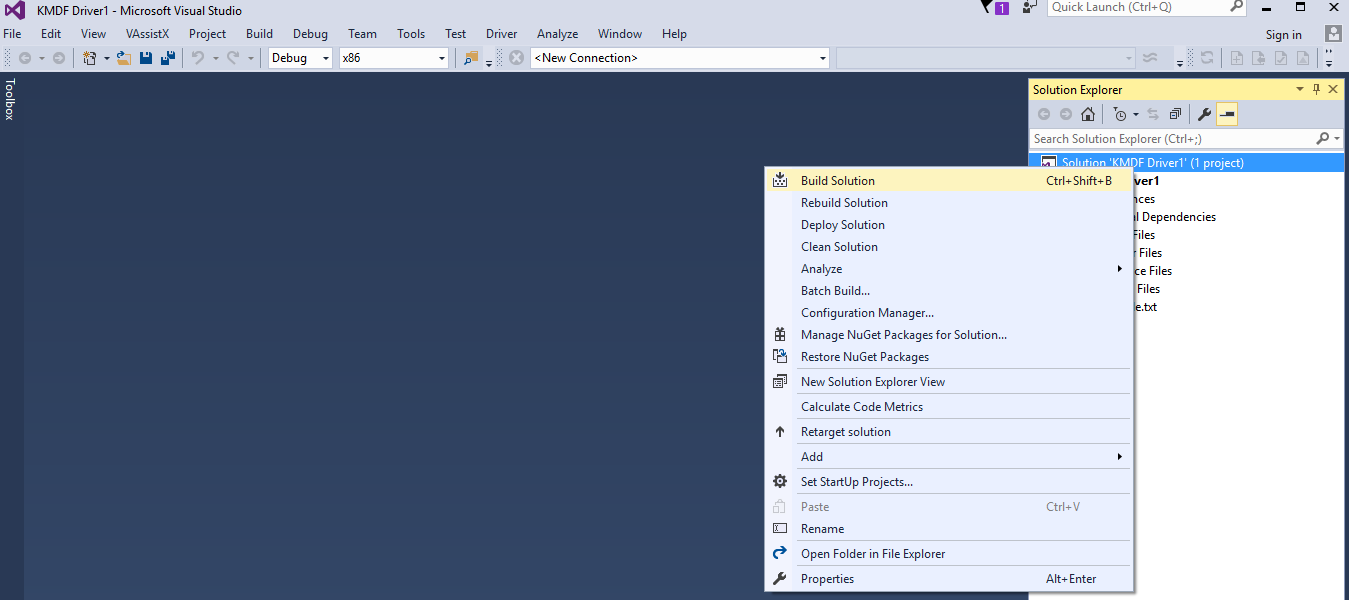
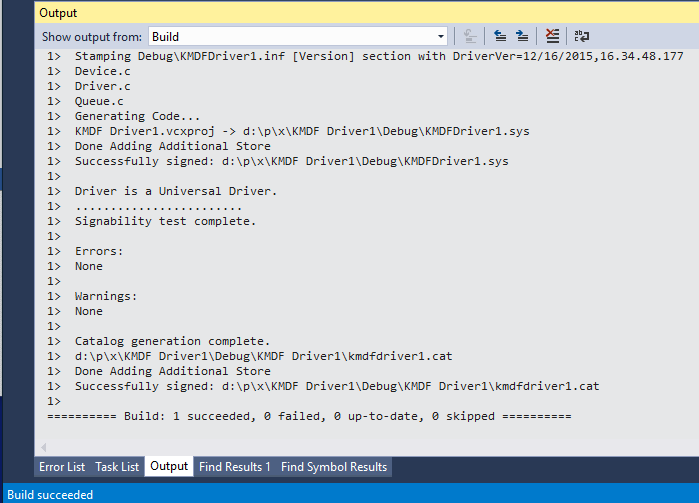
Click “Next” and ensure that you have access to the path in the “Location:” box (if not, adjust properly). Click the “Create” button. Wait for the template project to be generated. Once the project has been successfully created, ensure “Debug” and “x64” are selected as the Solution Configuration and Solution Platform, respectively. Then, right click the solution and select “Build Solution” from the pop-up dialog: Within a few seconds, the build should complete and the Visual Studio output window should indicate that the build is successful: If the build succeeds, you know that your lab system configuration of Visual Studio and the Windows Driver kit is ready for your labs!
If you have problems, check the installation and build steps carefully. When the steps are followed, and the installs are successful, we know this procedure works. If you can’t diagnose the problem on your own, contact the OSR Seminar Team and one of our engineers will try to help you.
Having Trouble?
To make your life simple, we recommend you using a Test System that’s not domain joined and not subject to your employer’s management scheme (if there is one). By far, the majority of problems we see in class with people setting up lab systems are due to their trying to do stuff to managed systems that their employers make difficult. So, if you’re everyday system is company managed, you might consider using a non domain-joined Test System that you setup specifically for doing your labs.